Install Ubuntu with Full-Disk Encryption

Introduction
The first step to create your personal server is the installation of your Operating System. There are many different choices available, most of them Linux-based. In this blog, I am using Ubuntu and I find it to be very user-friendly, specially for beginners.
Now, if you are like me, part of the reason you wanted your own personal server is to have more security. To have a reasonably secure server, we need to encrypt the main partitions which adds more complications. However, it is highly recommended. One thing that I learned after a few months of running a server without encryption was this: to my great surprise, if your system is not encrypted, NOTHING protects it against physical access! Think about it; someone can just steal your sever and VERY EASILY access your entire system. When I say very easily, I mean it. No hacking skill is necessary. So, please encrypt your partitions and keep the key/passphrase in a safe place.
Lastly, it is also highly recommended that you try this in an experimental set up to get the hang of it. To do this, you need to use a software like Oracle VM VirtualBox. If you decide to go this route, there is no need to create the bootable USB disk! You can continue from Step 2.
Step 1: Creating a Bootable Disk
In order to install Ubuntu, you need a start-up disk. This can be a 4GB (or higher) USB flash disk. Head to Ubuntu's official website and install the latest Desktop version. There is an Ubuntu Server edition as well and the only difference here is that the Desktop edition has GUI. It does not mean it lacks server abilities!
Once you downloaded the file (in .iso format), it's time to write it to your USB disk. You cannot simply copy and paste it. There are several free software that can do this for you. My favorite is Rufus. It's very light and easy to use. Just download and open the tool and select the iso file you downloaded. Make sure the USB drive is selected otherwise you might format one of your computer drives! It will take a few minutes for the process to finish, but once done you are ready to install Ubuntu.
Step 2: Booting Using USB Disk
Turn on your server (or laptop/PC) while the bootable USB disk connected to your computer. If there is no OS on the system, it should automatically boot from your USB disk. If not, you need to enter the BIOS and change the boot order so that it starts with the USB. Getting into BIOS is different in each computer but most of the times it just involves pressing a specific key right after you turn on the computer.
When the boot process is complete, you will see a very tiny boot menu with multiple options; choose Try Ubuntu without Installing.
Wait until it loads the Ubuntu from your USB.
Step 3: Partitioning
Disclaimer: This step is Extremely important. You might erase and lose your existing data if you are not careful.
Here, there are two possible scenarios. First, your hard disk is completely empty and there is nothing on it. This is a rather simpler option and has no risks! The second scenario is when you either have a data partition or another OS that you intend to keep. In this case, you must be very careful not to erase these by mistake.
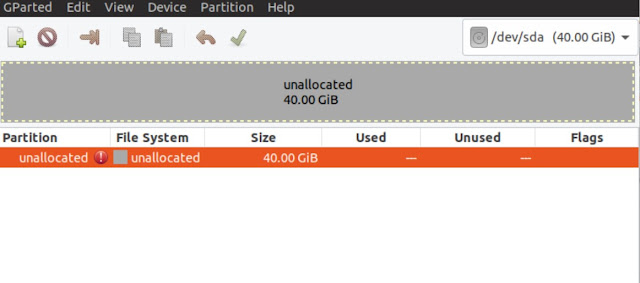
First, open GParted from the menu. If you have an empty disk, yo will see something like this:

As you can see, currently there are no partitions. If your disk has already some partitions on it, you need to make note of these partitions:
If you already have an Ubuntu OS and want to remove it, then you need to delete BOOT and System partitions. Keep in mind that it will completely erase those partitions, so if you need to back up your data if beforehand.
Also, if you have several disks on your server, you can switch between them using the drop-down menu on the top-right corner of GParted. Just make sure you are choosing the correct disk here!
Step 4: Creating the Required Partitions
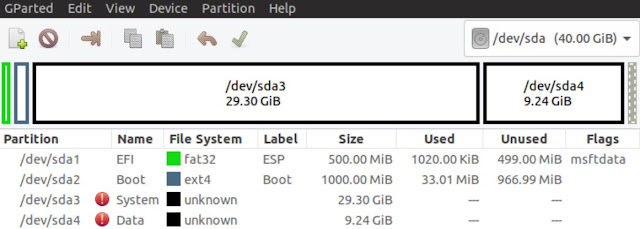
Using GParted, you need to create the following partitions:
- EFI System Partition: Format FAT32, Name: EFI, Recommended Size: ~500 MB
- Boot: Format Ext4, Name: Boot, Recommended size: ~1GB
- System: Format Cleared, Name: System, Recommended size: at least 15GB
- Data: Format Cleared, Name: Data
At the end, apply the changes. GParted should now look like this:

Write down the partitions; for the rest of this guide these
- EFI is mounted at /dev/sda1
- Boot is mounted at /dev/sda2
- System is mounted at /dev/sda3
- Data is mounted at /dev/sda4
If your partitions are different, you need to change these accordingly for the rest of the guide. It is very important!
Now it is time to create our encrypted partitions. You need to specify an encryption passphrase for System and Data partitions. Make sure they are long (at least 10 characters), and write these down somewhere.
If you lose your encryption passphrases, you will lose access to your data completely.
Open a terminal and type these commands:
sudo cryptsetup luksOpen /dev/sda3 system
sudo pvcreate /dev/mapper/system
sudo vgcreate sys-gr /dev/mapper/system
sudo lvcreate -n swap -L 4G sys-gr
sudo lvcreate -n root -l +100%FREE sys-gr
sudo cryptsetup luksFormat --hash=sha512 --key-size=512 --cipher=aes-xts-plain64 --verify-passphrase /dev/sda4
sudo cryptsetup luksOpen /dev/sda4 data
sudo pvcreate /dev/mapper/data
sudo vgcreate data-gr /dev/mapper/data
sudo lvcreate -n home -l +100%FREE data-gr
Step 5: Running the Installation Program
Then, run the Install Ubuntu shortcut from the desktop. Choose Normal Installation and select Install third-party software ... on the third screen. Next page, choose Something else and press Continue. Then, make sure you make these changes:
- Right click on the second /dev/mapper/data--gr-home" (the one with the size and other info). Click on "Change" and then "Use as: Ext4 ...", check "Format the partition" only if it is a new partition and then "Mount point: /home"
- Right click on the second "/dev/mapper/system--gr-root". Click on "Change" and then "Use as: Ext4 ...", check "Format the partition" and then "Mount point: /"
- Right click on the second "/dev/mapper/data--gr-swap". Click on "Change" and then "Use as: swap area".
- Right click on "/dev/sda1". Click on "Change" and then "Use as: EFI System Partition".
- Right click on "/dev/sda2". Click on "Change" and then "Use as: Ext4 ...", check "Format the partition" and then "Mount point: /boot".
- At the bottom of the screen, for "Device for boot loader installation" choose the main disk (/dev/sda here).
The rest of the process should be easy to follow. When the installation ends, DO NOT RESTART! Press "Continue Testing".
Step 6: Final Settings
Go back to the terminal and enter these commands:
sudo mount /dev/data-gr/home /mnt/home
sudo mount /dev/sda1 /mnt/boot/efi
sudo mount /dev/sda2 /mnt/boot
sudo mount --bind /dev /mnt/dev
sudo mount --bind /run/lvm /mnt/run/lvm
sudo chroot /mnt
mount -t proc proc /proc
mount -t sysfs sys /sys
mount -t devpts devpts /dev/pts
Then, you need to fix the crypttab (this is the file that tells Ubuntu what drives are encrypted and also let you auto-mount an encrypted drive): We need to find the UUID of your encrypted partitions (/dev/sda3 and /dev/sda4 here) and add them to the crypttab. This can be automatically done using
UUID_DATA=$(lsblk --paths --output=NAME,UUID --noheadings /dev/sda4 | grep -E "^/dev/sda4 " | tr --squeeze-repeats ' ' | cut --delimiter=' ' --field=2)
tee /etc/crypttab >/dev/null \
<<<"$(
cat <<-END
#<name> <source device> < key file> <options>
system UUID=${UUID_SYSTEM} none luks,discard,noearly
END
)"
tee --append /etc/crypttab >/dev/null \
<<<"$(
cat <<-END
data UUID=${UUID_DATA} /root/keyfile luks,discard,noearly
END
)"
Now, we need to create a keyfile that mounts the Data partition automatically on boot. Run these lines and enter the passphrase for the Data partition when prompted:
chmod 0400 /root/keyfile
cryptsetup luksAddKey /dev/sda4 /root/keyfile
Finally run
update-grub
Download the SH files: Main Installation CHROOT Commands
If you have issues with dual boot (having more than one OS on your system):
sudo apt-get update
sudo apt-get install -y boot-repair
boot-repair
